Photoshop for Interior Design — 28 Ways to Improve Your Images
If you’re an architect, interior designer, stylist, or furniture maker, you know how much effort goes into a photoshoot. And you know you’ve got to get it right the first time—reshoots are so rare!
The better you prepare a space for a photoshoot, the less work you’ll have later post processing and correcting images in Photoshop.
However, there are still A LOT of ways you can use Photoshop for interior design to clean up and improve your final images.
Maybe you’re looking to pitch your newest project to design publications. The last thing you want is for your photos to fall flat after you’ve spent all that time researching editors and composing the perfect pitch.
Below are several before and after examples that detail many of the ways you can improve your interior design photography in Photoshop. This will ensure your images are as clean and high quality as possible when you reach out to editors.
Key interior design spaces and what to do in Photoshop
The post includes three key spaces in any residential interior design project—living room, kitchen, and bedrooms. The tips from these three spaces apply to rooms across any project.
Before - the photos as received from the professional photographer.
After - the photos after they have been edited in Photoshop to remove things like glare, wires, and unintended elements. I’ve also noted several issues that could not be fixed in Photoshop, aka things to pay extra careful attention to during your shoot.
Interior design photoshoot pro tip
Use this list to get started on a photoshoot and post-processing checklist. Bring it to every shoot and use it to make final image edits.
Living Room - Photoshop tips for Interior Design

1. Don’t over expose windows.
Over exposed windows means they are a bright jarring white where outdoor scenery cannot be seen.
A professional photographer with experience in interior design photography will be able to help you avoid this (but be sure to ask!)
In most cases they will use a technique called ‘bracketing’. This involves taking several photos from the exact same camera position but at different exposure settings. They will then use Photoshop to composite the photos together.
2. Straighten TV and reduce glare.
TV glare can distract from the overall image and they often reflect elements that don’t make sense in that particular scene, in this case a bit of a stained glass window.
Unlike over exposed windows, TV glare is difficult to avoid during a shoot but is quick and easy to remove in Photoshop. Also, be sure that elements like TVs and art are straight.
3. Reduce glare on other objects.
Like TV glare, bright glare on other dark glossy surfaces can detract from a the image by making it look less professional.
Interiors photography for media outreach should show off the space and the styling. Wherever possible comb your images for elements that reduce the professionalism of your photos.
4. Reduce excess visual information.
As you saw in #3, a lot of the tips here are about cleaning up an image by reducing unnecessary or distracting elements. Loose wires, colored lights, and logos on electronics can crowd an image and draw attention to the least important elements of a room.
5. Remove extra speakers.
Ideally loose elements like these speakers would be removed before a photoshoot. Removing them in Photoshop can be time consuming, but it’s an okay second option.

6. Color correct stained glass window.
Fixing this stained glass window in photoshop was quite time consuming. Like over exposed windows this is an element that should have been addressed during the shoot.
This room should have been photographed at different exposure settings to ensure that the stained glass colors were captured accurately (even if the rest of the room was too dark), then the best-lit stained glass window could have been combined with the best-lit room shot.

7. Adjust the position of sculptures.
This whole shot is a lesson in just because the room is “ready” doesn’t mean you won’t still have to move things around. It’s important to remember that each individual shot is composed and wherever possible small elements should not be cut off.
This shot would have been better if these two sculptures were either pulled completely out of the scene or pushed forward a bit so that they were not cut off. This is an example of why it’s important to check photos on a screen during a shoot.
8. Remove unidentifiable accessories.
It would have been easier to move this microphone out of the scene during the shoot. The client for this project is a singer and often hosts friends for small shows in her home. The designers wanted to make sure to take an image showing her doing that! They just didn’t need to have that extra microphone off to the side. However, it was relatively easy to remove in Photoshop.
9. Remove the cut off sculpture.
Again, it would have been so much easier to move this element out of the frame during the shoot. Instead, a lot of time was spent in Photoshop using the clone stamp tool to cover up the sculpture with the table’s wood texture. A good rule of thumb is, if you can’t tell what an object is in a scene, consider removing it.
10. Check your curtains.
Always check curtains that reach the floor and adjust them so they look as good as possible. Add this to your checklist, crumpled or poorly arranged curtains are almost impossible to fix in Photoshop and can make a whole shot look messy.
Interior design photoshoot pro tip (to save you time in Photoshop!)
Save some living room shots from your favorite design publications and do a quick scan for all these elements — sculptures, books, furniture, curtains, TVs, etc. Notice how everything is arranged and how the rooms are styled overall. This quick research is a two-for-one, you’ll develop a keener eye for your own photos AND you’ll get a better understanding of the standards and point of view of the publications you want to pitch.
If you want more guidance to make sure you’re taking the right photos for press outreach, get our 40-page guide on Residential Photography for Media Outreach.
Kitchen - Photoshop tips for Interior Design

11. Re-crop the image.
Once you have final images, it’s always a good exercise to test cropping images differently; you’ll often find that an okay shot can become a great shot by simply zooming in a bit. In this case, the window doesn’t add a lot to this scene, so a cropped frame ended up delivering a cleaner image.
12. Straighten pendants.
Like TVs and art, anything that is hanging should be straight. Be sure to look out for this during the shoot and during post-processing.
13. Remove labels.
Sometimes clients like labels (who knows!) and you won’t be able to remove everything you would like to. Things like labels can be removed in Photoshop.
14. Pull back blind cord.
This shoot would have been a bit cleaner if the chord had been tucked away and not visible in the shot. When we say the devil is in the details, this is what we’re talking about.
15. Remove unintended object.
Another reminder to look carefully at the images on the camera during the shoot to catch issues like this.

16. Check your crop.
Once the image was cropped a bit (see 19) only the tip of the ceiling light was visible. It was removed to make the image cleaner. If the light was left there wouldn’t be enough information to understand what that bit on the ceiling was and it would have been confusing and distracting.
17. Remove excess distracting glare.
Same as mentioned above, whenever you have the chance to remove excess glare you probably should.
18. Remove labels.
Again, pay attention to little elements that distract from the overall image.
19. Zoom to remove elements that are cut off.
This is another example of how a slight zoom-in crop really improved this image. The fridge handles, stove top, and edge of a wall-mounted china cabinet were only partially visible and did not add anything to the image. After zooming in a bit the shot is clearer and cleaner.
Bedrooms - Photoshop tips for Interior Design

20. Fix the seam.
This sliding door was finished with a large-format photograph, which was printed in two pieces. The small white seam between the two sheets was corrected in Photoshop.
21. Remove corner mirror.
This was an unplanned client add-on (it happens). Of all the Photoshop work this was the most difficult element to remove. Now the image correctly represents the designer’s vision and can help them land more clients that appreciate their choices.
22. Reduce glare.
Okay, getting to be a bit of a broken record on the glare point.
23. Remove unintended object.
This small stool looked fine in the straight on shot of bed, but looks strange in this image. Again, a room may be staged perfectly but depending on the shot angle you will still need to push and pull elements to compose a great shot.

23. Adjust bedding color.
This was an artistic decision made during the photo editing process. The designer didn’t want the bedding to be misinterpreted as a bare mattress.
24. Remove air conditioning label and cut-off sculpture.
This is yet another example of the little things to pay attention to when you are shooting and editing your images. If you can’t make out what a small element is, it probably shouldn’t be in the shot.
25. Remove external blinds.
This project included fixed external blinds that looked strange in the final image. This was a more difficult issue to fix in Photoshop.
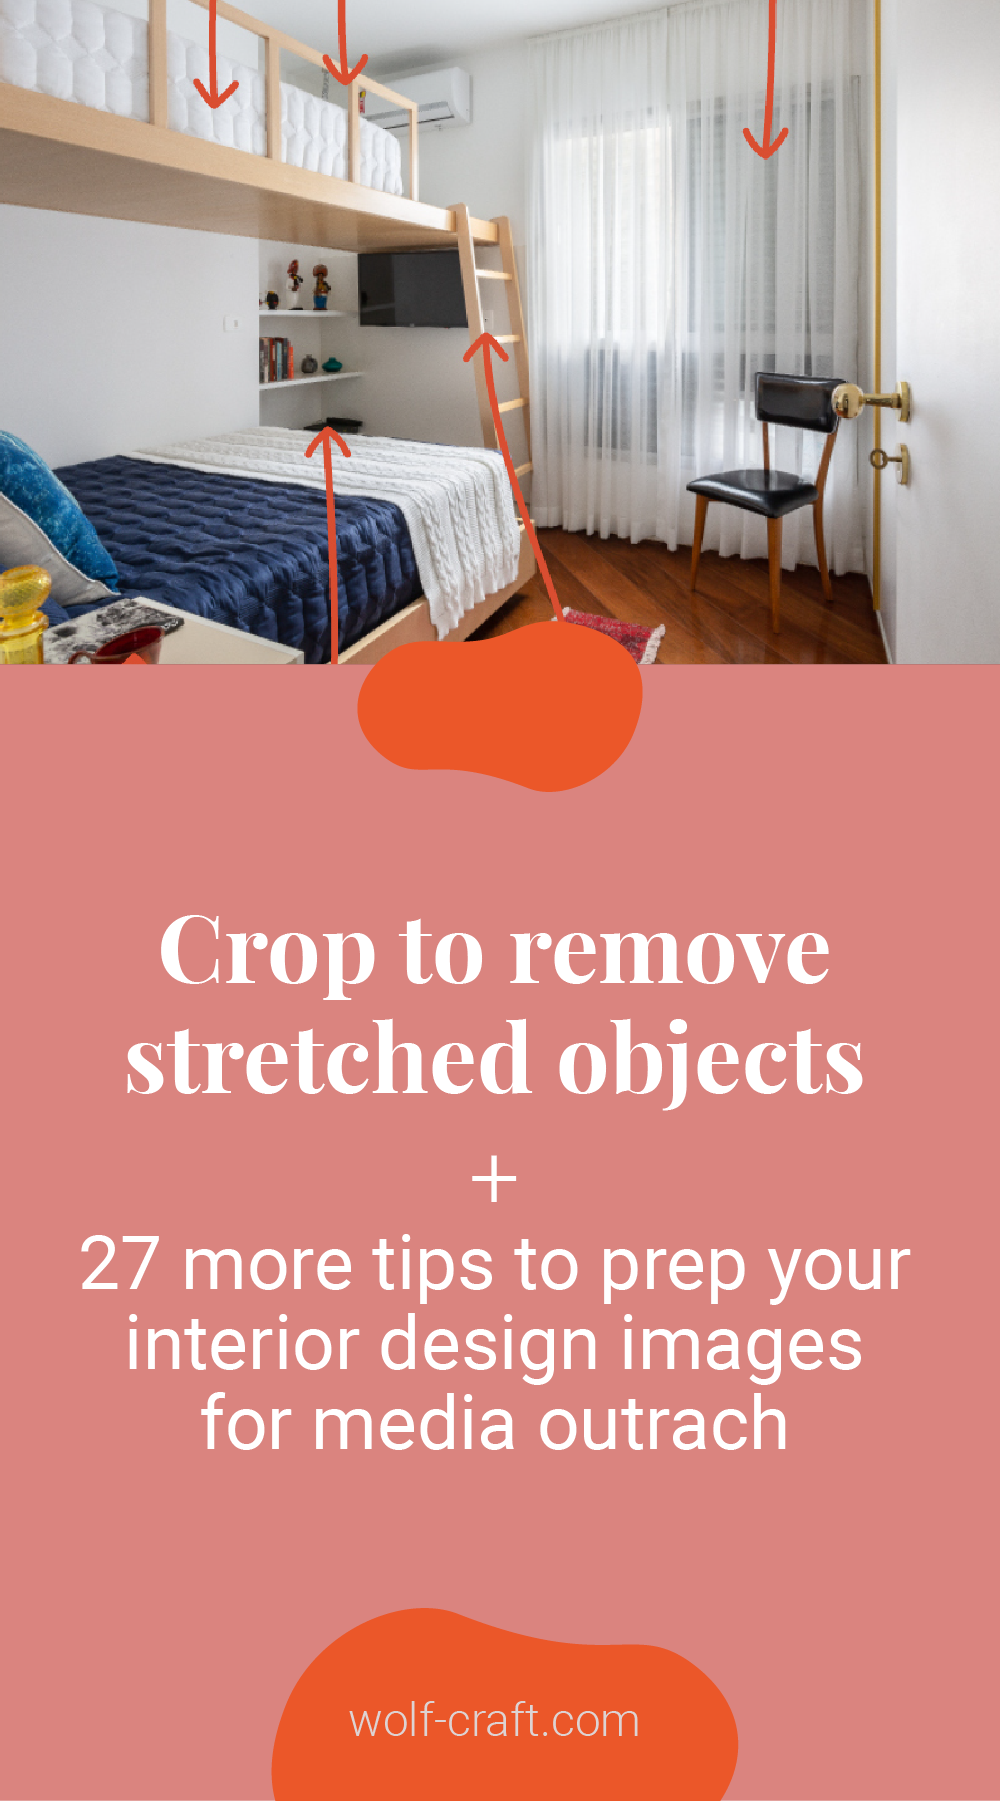
26. Zoom to remove cut-off elements.
Again, prepare and style your whole space then make sure you individually compose each image. This nightstand could have easily been pulled out of this shot during the shoot.
27. Remove excess wires and ‘stuff’.
Same as previous points. Be sure both during the shoot and while post processing that your images show off the space and not clutter and excess elements that don’t add to the scene.
28. Remove outlet.
Outlets (especially if they are mid-wall) can be distracting and make an image look messy. This is yet another element to keep an eye out for while you are post processing your images.
Project: Manacá Architecture. Photos: Gisele Rampazzo.